Building a URL-shortener server

I'm a software engineer with 4 years of experience in both frontend and backend aspect of web development.
As a software developer or an engineer, building projects is one of the ways to show growth no matter your level. It’s also a way to give confidence and self-boost in your skills.
In this article, we will be building a URL shortener using Nodejs and Express, this project is a beginner-friendly project that requires prior knowledge of programming and javascript. Let’s get started.
Requirements
What you need to complete the project:
A working PC
Vscode or any code editor of your choice (Download vscode here)
Nodejs (Download nodejs here )
An account with MongoDB (How to create an account)
Process
Create a folder that will contain the project and open the folder in your code editor
In your code editor, open the terminal and type
npm initto create the boilerplate of our projects, some questions are going to show up but we will leave the default answers to them by clicking enter, fordescriptionandauthoryou can input the project description and your name accordingly. In the end, you will have apackage.jsonfile that looks like this
{
  "name": "url-shortner",
  "version": "1.0.0",
  "description": "url-shortner server project",
  "main": "index.js",
  "scripts": {
    "test": "echo \"Error: no test specified\" && exit 1"
  },
  "author": "favalcodes",
  "license": "ISC",
}
3. We are going to arrange our file structure and install some dependencies, first, let’s create our project entry point, create a folder in the root project, and name it src , open the folder and create three folders inside the src folder namely models , middlewares, and controllers , also create a file and name it server.js this is going to be our main entry point that is going to house our server. so far we should have something like
--url-shortner
    --src
      --controllers
      --middlewares
      --models
      server.js
    package.json
4. Let’s go ahead to download some dependencies:
Nodemon: this package helps to restart the project whenever there’s a change without having to manually restart, it is meant to be used only in the development stage, that’s why we are going to install it as a dev dependency using
npm i -D nodemonExpress: At the beginning of this article, I mentioned we are going to use node js and express to build our project. Express is a minimal and flexible Node.js web application framework that provides a robust set of features for web and mobile applications, to install
npm i expressMongoose: Mongoose is a MongoDB object modeling tool designed to work in an asynchronous environment, to install
npm i mongooseCors: this is a node.js package for providing an Express middleware that can be used to enable Cross-origin resource sharing (CORS) with various options, to install
npm i corsNanoid: this is a package to generate random alphanumeric strings, to install
npm i nanoidValidate.js: this is a package used for validation, to install
npm i validate.jsExpress Async Handler: this is a package is a simple middleware for handling exceptions inside of async express routes and passing them to your express error handlers, to install
npm i express-async-handlerDotenv: this is a package that loads environment variables from a .env file into process.env, to install
npm i dotenv
At the end of the installation, edit the package.json file, erase the test script, and replace it with a new script that will help start our server, "dev”: nodemon src/server.js, our package.json file will look like this after editing
{
  "name": "url-shortner-server",
  "version": "1.0.0",
  "description": "a url shortner server application",
  "main": "src/server.js",
  "scripts": {
    "dev": "nodemon src/server.js"
  },
  "author": "favalcodes",
  "license": "ISC",
  "dependencies": {
    "cors": "^2.8.5",
    "dotenv": "^16.3.1",
    "express": "^4.18.2",
    "express-async-handler": "^1.2.0",
    "mongoose": "^7.4.0",
    "nanoid": "^3.3.6",
    "validate.js": "^0.13.1"
  },
  "devDependencies": {
    "nodemon": "^3.0.1"
  }
}
5. Open the server.js file and paste this
const express = require('express')
const bodyParser = require('body-parser')
const cors = require('cors')
require('dotenv').config()


const app = express()
const corsOptions = {
    origin: process.env.WEB_URL,
    optionsSuccessStatus: 200
  }

app.use(cors(corsOptions))
app.use(bodyParser.urlencoded({ extended: true}))
app.use(bodyParser.json())

app.listen(process.env.PORT, () => {
    console.log(`server started on ${process.env.APP_URL}:${process.env.PORT}`)
})
The above code block sets up a basic Express.js server with some middleware to handle the HTTP requests, using app.use() sets up the middleware. Body-parser is used to parse the request bodies into JSON format, it also listens to the port which is retrieved from the .env file and logs out the server started on the allocated URL and port.
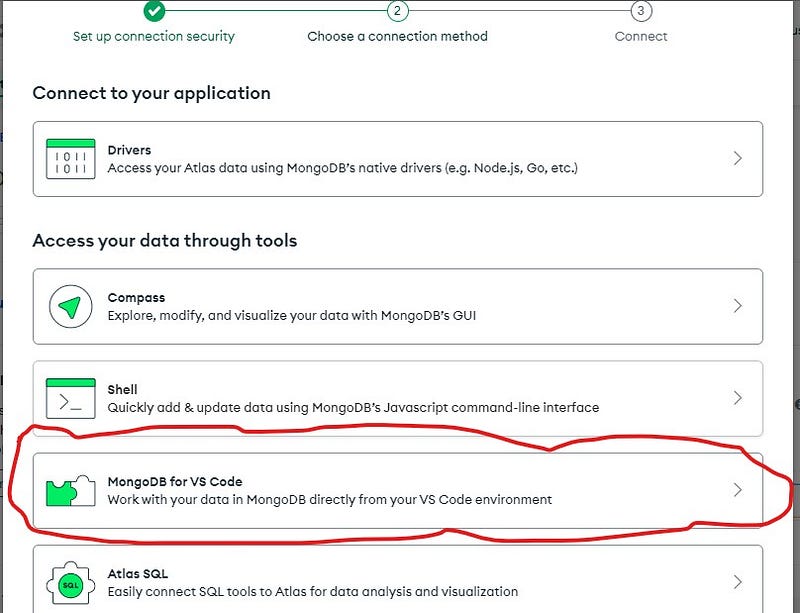
6. At the beginning of the article, we created a MongoDB account, we will need to create a db collection where all our data will be stored (Note: I’m using MongoDB atlas), If you don’t know how to create a db collection in MongoDB, click here. After creating our db collection, it’s time to connect to our db, I’m using the vscode tool
After a successful connection, we can go ahead to connect our project to our db. (Note: don’t forget to add the MongoDB URL to our .env file).
7. Create a new file in our project root folder, and name it database.js , this file will hold our db connection, paste the below code into the file
const mongoose = require('mongoose')

const connectDb = (url) => {
    try {
        return mongoose.connect(url)
    } catch (error) {
        return new Error(error)
    }
}

module.exports = connectDb
In the above code, we are connecting to our db through Mongoose using the URL that is passed into the connectDb function, we went ahead to export our function to use it somewhere else.
8. We will edit our server.js file to connect to our db once our server starts,
const express = require('express')
const bodyParser = require('body-parser')
const cors = require('cors')
const connectDb = require('./database')
require('dotenv').config()


const app = express()
connectDb(process.env.MONGO_URL)
const corsOptions = {
    origin: process.env.WEB_URL,
    optionsSuccessStatus: 200
  }

app.use(cors(corsOptions))
app.use(bodyParser.urlencoded({ extended: true}))
app.use(bodyParser.json())

app.listen(process.env.PORT, () => {
    console.log(`server started on ${process.env.APP_URL}:${process.env.PORT}`)
})
9. Time to create our db schema, create a new file inside the models' folder and name it url.js , paste the following code
const mongoose = require("mongoose");

const urlSchema = new mongoose.Schema(
  {
    url: { type: String, required: true },
    shortUrl: { type: String, required: true },
    urlKey: { type: String, required: true },
  },
  {
    timestamps: true,
  }
);

const urlModel = mongoose.model("Url", urlSchema);

module.exports = urlModel;
our URL document will contain the URL(initial URL), the converted shortUrl, and the urlKey.
10. In our controller folder, create a new file and name it urlController.js and paste the following code
const urlModel = require("../models/Urls")
const { validateUrl } = require("../validator/urlValidator")
const {customAlphabet} = require('nanoid')
const asyncHandler = require('express-async-handler')


const shortenUrl = asyncHandler(async (req, res) => {
    try {
        const { url } = req.body
        await validateUrl(url)
        const shortId = customAlphabet('1234567890abcdef', 10)
        const urlKey = shortId()
        const shortUrl = `${process.env.WEB_URL}/${urlKey}`
        await urlModel.create({ url, shortUrl, urlKey})
        res.status(200).json({ message: 'Url shortened', url: shortUrl})
    } catch (error) {
        res.status(500)
        throw new Error(error)
    }
})

const getUrl = asyncHandler(async (req, res) => {
    try {
        const urlKey = req.params.url
        const isExist = await urlModel.findOne({urlKey})
        if (!isExist) {
            res.status(404)
            throw new Error('Url does not exist')
        }
        res.redirect(isExist.url)
    } catch (error) {
        res.status(500)
        throw new Error(error)
    }
})

module.exports = {shortenUrl, getUrl}
In the above code, we used the express-async-handler, we also created two functions:
a. shortenUrl: this function receives the URL that needs to be shortened, validates the URL to be sure we are working with a URL, then creates a URL key with the help of nanoid and goes ahead to append the key to the app or server URL to make a new URL, then we save the URL, the newly created URL and the urlkey to our db. if successful, it returns a success message or else it returns an error.
b. getUrl: this function redirect the user to the original url using the urlKey, if the urlKey exists, if not, it throws an error.
In the above code, we imported a file we haven’t created yet, let’s go ahead and create the file.
11. In the validators folder, create a file and name it urlValidator.js and paste the following code
const validate = require('validate.js')

const validateUrl = async (url) => {
    return validate({website: url}, {website: {url: true}});
}

module.exports = { validateUrl }
In the above code, we use validate.js package to validate our incoming URLs, if they are a website URL.
12. It’s time to create our routes to be able to access our functions, create a file in the project root folder and name it routes.js and paste the following code
const express = require('express')
const { shortenUrl } = require('./controllers/urlController')

const router = express.Router()
router.post('/shorten-url', shortenUrl)

module.exports = router
13. Add the routes to server.js, our file looks like this
const express = require('express')
const bodyParser = require('body-parser')
const cors = require('cors')
const connectDb = require('./database')
const router = require('./routes')
const { getUrl } = require('./controller/urlController')
require('dotenv').config()


const app = express()
connectDb(process.env.MONGO_URL)
const corsOptions = {
    origin: process.env.WEB_URL,
    optionsSuccessStatus: 200
  }

app.use(cors(corsOptions))
app.use(bodyParser.urlencoded({ extended: true}))
app.use(bodyParser.json())
app.get('/:url', getUrl)
app.use('/api', require('./routes'))

app.listen(process.env.PORT, () => {
    console.log(`server started on ${process.env.APP_URL}:${process.env.PORT}`)
})
Our server is 90% ready, the last thing to handle are errors, we need to format our errors to be readable by users
14. Inside our validator folder, let’s create a new file and name it errorHandler.js and paste the following code
const { constants } = require("../constants");

const errorHandler = (err, req, res, next) => {
 const statusCode = res.statusCode || 500
 switch (statusCode) {
    case constants.VALIDATION_ERROR:
        res.json({title: 'Validation Error', message: err.message, stackTrace: err.stack})
        break;
    case constants.NOT_FOUND:
        res.json({title: 'Not Found', message: err.message, stackTrace: err.stack})
        break;
    case constants.UNAUTHORIZED:
        res.json({title: 'Unauthorized', message: err.message, stackTrace: err.stack})
        break;
    case constants.FORBIDDEN:
        res.json({title: 'Forbidden', message: err.message, stackTrace: err.stack})
        break;
    case constants.SERVER_ERROR:
        res.json({title: 'Server error', message: err.message, stackTrace: err.stack})
        break;

    default:
        break;
 }
}

module.exports = errorHandler
In the above code, we called a file that we have created, the file contains some error constants that we will be using, let’s go ahead and create a file in our project root folder and name it constants.js and paste the following code
exports.constants = {
    NOT_FOUND: 404,
    VALIDATION_ERROR: 400,
    UNAUTHORIZED: 401,
    FORBIDDEN: 403,
    SERVER_ERROR: 500
}
We are going to edit our server.js to handle the errorHandler as a middleware
const express = require('express')
const bodyParser = require('body-parser')
const cors = require('cors')
const connectDb = require('./database')
const router = require('./routes')
const { getUrl } = require('./controllers/urlController')
const errorHandler = require('./validator/errorHandler')
require('dotenv').config()


const app = express()
connectDb(process.env.MONGO_URL)
const corsOptions = {
    origin: process.env.WEB_URL,
    optionsSuccessStatus: 200
  }

app.use(cors(corsOptions))
app.use(bodyParser.urlencoded({ extended: true}))
app.use(bodyParser.json())
app.get('/:url', getUrl)
app.use('/api', require('./routes'))
app.use(errorHandler)

app.listen(process.env.PORT, () => {
    console.log(`server started on ${process.env.APP_URL}:${process.env.PORT}`)
})
We are finally done with creating our server 🥳🥳🥳, you can go ahead and test your API with your testing tool, I use Postman for testing my APIs.
Have any questions or have a blocker, don’t forget to reach out in the comment section, I’ll be happy to help 😃.
